Roasted Garlic and Rosemary Sourdough Bread Recipe

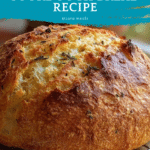
This Roasted Garlic and Rosemary Sourdough Bread combines the tangy depth of traditional sourdough with the rich, fragrant flavors of roasted garlic and fresh rosemary. The bread features a crisp, golden crust and a tender, chewy crumb, making it an irresistible artisan loaf perfect for sandwiches, toasts, or as a flavorful accompaniment to any meal.
- Prep Time: 15 minutes
- Cook Time: 45-50 minutes
- Total Time: 6 to 9 hours (including fermentation and proofing; or up to 24 hours if refrigerated overnight)
- Yield: 1 loaf (about 1.5 to 2 pounds) 1x
- Category: Bread
- Method: Baking
- Cuisine: Artisan, European
- Diet: Vegetarian
Ingredients
Scale
Sourdough Starter and Dough
- 1 cup active sourdough starter
- 4 cups bread flour
- 1 ½ cups water
- 2 teaspoons sea salt
- 2 tablespoons roasted garlic (mashed cloves)
- 2 tablespoons fresh rosemary (chopped)
For Roasting Garlic and Finishing
- 1 whole garlic bulb (for roasting)
- Olive oil (for drizzling and brushing crust)
Instructions
- Prepare the Roasted Garlic: Preheat your oven to 400°F (200°C). Slice the top off a whole garlic bulb to expose the cloves. Drizzle the exposed cloves with olive oil, then wrap the bulb tightly in foil. Roast in the oven for 30-35 minutes until the garlic cloves are soft and fragrant. Remove from the oven and allow to cool before squeezing out and mashing the roasted cloves gently.
- Mix the Dough: In a large mixing bowl, combine the active sourdough starter with water and stir until fully dissolved. Add the bread flour, sea salt, chopped fresh rosemary, and the mashed roasted garlic. Stir all ingredients together until a rough dough forms, then knead on a lightly floured surface for 10-12 minutes until the dough is smooth and elastic.
- Bulk Fermentation: Place the kneaded dough into a lightly oiled bowl, cover it with a damp cloth or plastic wrap, and let it ferment at room temperature for 4 to 6 hours. During this time, perform stretch and folds every hour to strengthen the gluten network and promote good dough structure. The dough should double in size by the end of this period.
- Shape the Loaf: Gently transfer the fermented dough onto a floured surface and shape it into a tight boule (round) or batard (oval). Place the shaped dough seam-side up into a well-floured banneton basket or a bowl lined with a floured towel to help maintain its shape during proofing.
- Final Proof: Cover the shaped dough and allow it to proof at room temperature for 2-3 hours until puffy, or alternatively refrigerate overnight for a slower rise which enhances flavor and texture.
- Bake the Bread: Preheat your oven to 450°F (230°C) and place a Dutch oven or heavy baking pot inside to heat. Once heated, carefully transfer the proofed dough, along with the parchment paper it rests on, into the Dutch oven. Score the top of the dough using a sharp blade to allow controlled expansion. Cover with the lid and bake for 20 minutes. Then remove the lid to allow the crust to brown and bake for an additional 20-25 minutes until the crust is deeply golden and crisp.
- Cool Before Slicing: Remove the bread from the oven and transfer it to a wire rack. Allow it to cool completely before slicing so the crumb sets properly, ensuring a perfect texture and sliceability.
Notes
- Using a Dutch oven to bake helps simulate steam in the oven, which creates a crustier bread.
- Refrigerating the dough overnight during final proof develops deeper flavors and improves texture.
- Ensure your sourdough starter is active and bubbly for the best rise.
- Adjust hydration slightly if your dough feels too sticky or dry based on flour absorption.
- The roasted garlic adds a mellow sweetness compared to raw garlic’s pungency.
Keywords: sourdough bread, roasted garlic bread, rosemary bread, artisan bread, homemade bread, sourdough recipe