No-Bake Strawberry Cheesecake Jars Recipe
Introduction
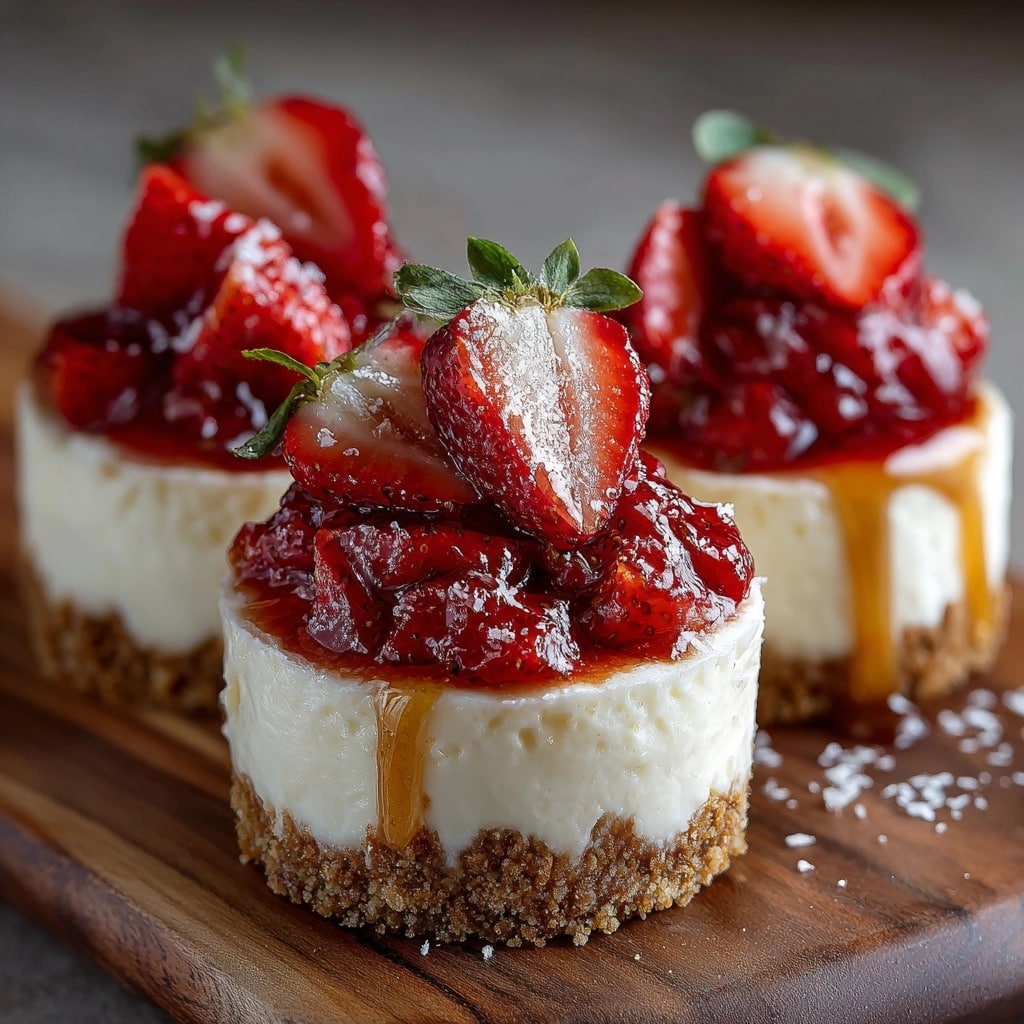
These No-Bake Strawberry Cheesecake Jars are a delightful and convenient dessert, perfect for warm days or when you want a sweet treat without turning on the oven. Layered with creamy cheesecake filling, fresh strawberries, and a buttery vanilla wafer crust, they’re as easy to make as they are delicious.
Ingredients
- 8 ounce package high-quality vanilla wafers
- 3 tablespoons unsalted butter (melted)
- 8 (8-ounce) mason jars
- 8 ounces reduced-fat cream cheese (softened)
- ½ cup plain Greek yogurt (approximately 5.3 ounces)
- ¼ cup granulated sugar
- ½ teaspoon vanilla extract
- Zest of 1 lemon
- 1 teaspoon lemon juice
- 1 ½ cups high-quality whipped topping (such as Truwhip)
- 4 cups hulled and quartered strawberries (divided)
Instructions
- Step 1: Place the vanilla wafers into a food processor and pulse until they become fine crumbs.
- Step 2: Pour the melted butter over the crumbs and pulse for 3-5 seconds until the mixture sticks together and looks clumpy.
- Step 3: Spoon about 2 tablespoons of the crumb mixture into the bottom of each mason jar. Press down lightly with a spoon—it doesn’t need to be packed tightly.
- Step 4: Refrigerate the jars to firm up the crust while you prepare the cheesecake filling.
- Step 5: In a large bowl, beat the cream cheese, Greek yogurt, and sugar with a hand mixer on high until smooth and creamy. Add vanilla extract, lemon zest, and lemon juice, then beat again until well combined.
- Step 6: Gently fold in the whipped topping and 1 cup of the quartered strawberries into the cream cheese mixture.
- Step 7: Remove the jars from the fridge. Spoon 2 to 3 tablespoons of cheesecake filling into each jar, then add 2 to 3 tablespoons of strawberries on top. Repeat layering with the remaining filling and strawberries.
- Step 8: Secure the lids on the jars and refrigerate for 1-2 hours or overnight. Serve chilled.
Tips & Variations
- For an extra burst of flavor, drizzle a little honey over the top before serving.
- Substitute fresh blueberries or raspberries for strawberries to change the fruit layer.
- If you don’t have a food processor, place the vanilla wafers in a sealed plastic bag and crush with a rolling pin.
Storage
Store the cheesecake jars in the refrigerator with lids tightly secured for up to 2 days for best freshness. To serve after storage, bring them to room temperature for about 10 minutes or enjoy straight from the fridge. Avoid freezing, as the texture may change.
How to Serve
Serve this delicious recipe with your favorite sides.
FAQs
Can I use regular yogurt instead of Greek yogurt?
Yes, you can substitute regular plain yogurt, but the texture may be slightly thinner and less creamy. Greek yogurt helps maintain a rich consistency.
Do I have to use mason jars?
No, any small containers or dessert cups will work well for layering and serving this no-bake cheesecake.
PrintNo-Bake Strawberry Cheesecake Jars Recipe

No-Bake Strawberry Cheesecake Jars are a delightful and easy-to-make dessert featuring layered vanilla wafer crumbs, creamy cheesecake filling made with reduced-fat cream cheese and Greek yogurt, and fresh strawberries, all assembled in individual mason jars. Perfect for a refreshing, fuss-free treat without the need for baking.
- Prep Time: 15 minutes
- Cook Time: 0 minutes
- Total Time: 1 hour 15 minutes (including chilling time)
- Yield: 8 servings 1x
- Category: Dessert
- Method: No-Cook
- Cuisine: American
- Diet: Low Fat
Ingredients
Crust
- 8 ounce package high-quality vanilla wafers
- 3 tablespoons unsalted butter (melted)
Filling
- 8 ounces reduced-fat cream cheese (softened)
- ½ cup plain Greek yogurt (5.3 ounces)
- ¼ cup granulated sugar
- ½ teaspoon vanilla extract
- Zest of 1 lemon
- 1 teaspoon lemon juice
- 1 ½ cups high-quality whipped topping (e.g., Truwhip)
Fruit
- 4 cups hulled and quartered strawberries (divided)
Other
- 8 (8-ounce) mason jars
Instructions
- Process Crust: Place the vanilla wafers into a food processor and process until they become fine crumbs. Pour the melted butter into the crumbs and process for 3-5 seconds until the mixture sticks together and appears clumpy.
- Press Crust Into Jars: Measure about 2 tablespoons of the crumb mixture into the bottom of each mason jar. Use a spoon to press down slightly; it doesn’t need to be packed tightly. Refrigerate the jars to let the crust firm up.
- Make Cheesecake Filling: In a large mixing bowl, combine softened cream cheese, plain Greek yogurt, and granulated sugar. Beat with a hand mixer on high speed until smooth and creamy. Add vanilla extract, lemon zest, and lemon juice and beat for another 30 seconds until well blended.
- Fold in Whipped Topping and Strawberries: Gently fold in the whipped topping and 1 cup of the hulled and quartered strawberries into the cream cheese mixture to keep it light and airy.
- Assemble Jars: Remove jars from the refrigerator. Spoon 2-3 tablespoons of cheesecake filling into each jar. Layer 2-3 tablespoons of remaining strawberries over the filling. Divide the rest of the cheesecake filling over the strawberry layers, followed by the remaining strawberries.
- Chill and Serve: Secure lids on the jars and refrigerate for 1-2 hours or overnight to allow the flavors to meld and the cheesecake to firm up. Serve cold for a refreshing dessert.
Notes
- Use full-fat cream cheese for a richer and creamier texture if desired.
- Substitute gluten-free vanilla wafers to make this recipe gluten-free.
- For best results, chill the jars overnight to let flavors meld fully.
- This recipe can be easily doubled for larger gatherings.
- Leftover cheesecake jars can be refrigerated for up to 3 days.
Keywords: No-bake, Strawberry cheesecake, Cheesecake jars, Easy dessert, Healthy dessert, Mason jar dessert, Summer dessert