Knock Ya Socks Off Red Velvet Cake Recipe
Introduction
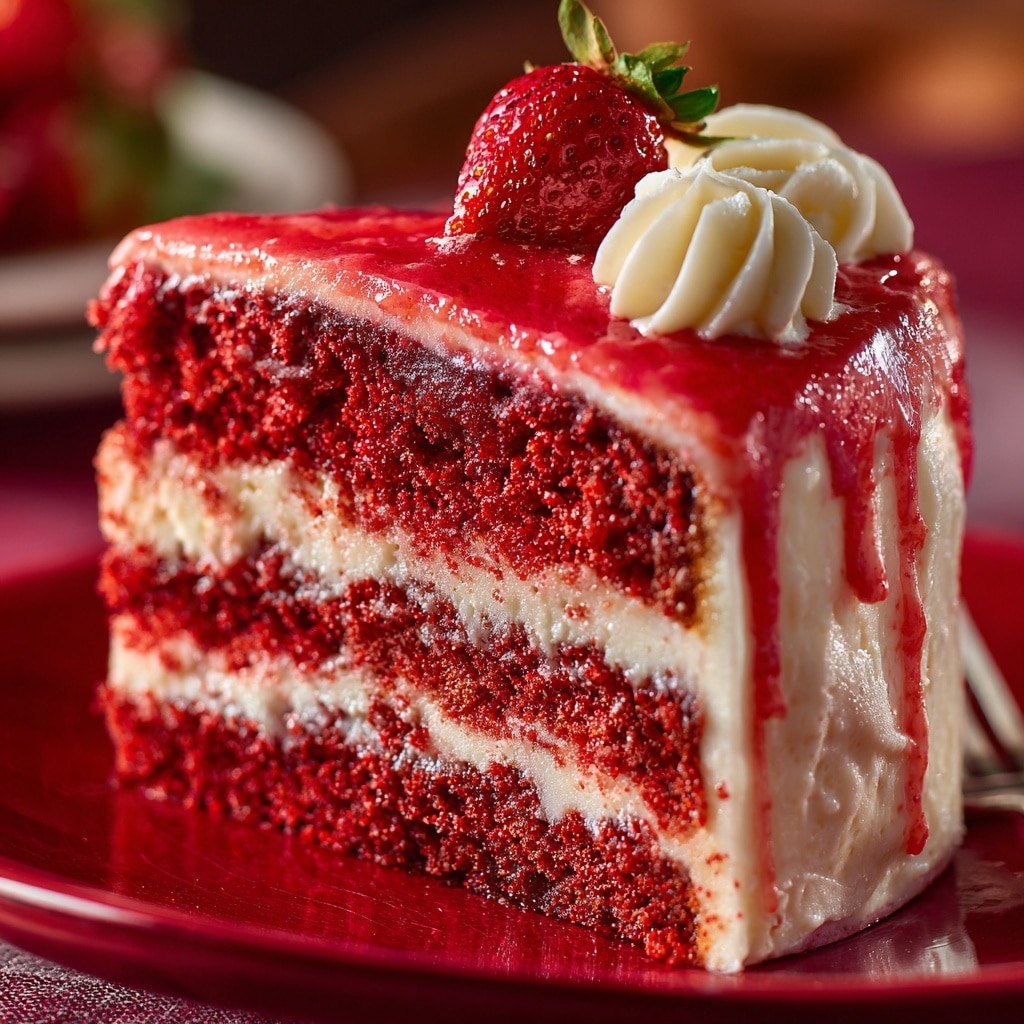
This Knock Ya Socks Off Red Velvet Cake is a rich and moist treat with a perfect balance of cocoa and tangy buttermilk. Topped with a creamy, fluffy cream cheese frosting, it’s sure to impress at any celebration or simply brighten your day.
Ingredients
- 3 cups all-purpose flour
- ¼ cup whole milk powder
- 1 cup packed dark brown sugar
- 1 cup caster/superfine sugar (or granulated sugar)
- 2 tablespoons unsweetened cocoa powder
- 1 teaspoon baking powder
- 1 teaspoon baking soda
- 1 teaspoon kosher salt
- 3 large eggs
- 1 cup vegetable oil
- 1 cup buttermilk
- 1 tablespoon vanilla bean paste (or extract)
- 2 teaspoons distilled white vinegar
- 2 tablespoons red liquid food coloring (I use McCormick)
- 1 cup hot black coffee
- 16 ounces full-fat cream cheese bricks, room temperature
- 1 cup (2 sticks) salted butter, room temperature
- 1 tablespoon vanilla bean paste
- 5 cups powdered sugar
- ¼ cup whole milk powder
Instructions
- Step 1: Position a rack in the center of the oven and preheat to 350°F. Spray the bottom and sides of three 8-inch round cake pans with nonstick cooking spray. Line each pan with parchment paper rounds and spray the paper as well. Set the pans aside.
- Step 2: In a large mixing bowl, combine the flour and whole milk powder, whisking well. Add both sugars, cocoa powder, baking powder, baking soda, and salt. Whisk again to fully combine the dry ingredients.
- Step 3: Add the eggs, oil, buttermilk, vanilla bean paste, vinegar, red food coloring, and hot coffee to the dry ingredients. Whisk everything until just combined; the batter should be runny. Divide evenly among the three pans and gently tap on the counter to release air bubbles. Let the cakes sit while the oven preheats.
- Step 4: Bake at 350°F for 30-35 minutes, or until a toothpick inserted in the center comes out clean. Cool cakes in the pans for 15 minutes, then invert onto a wire rack to cool completely before frosting.
- Step 5: For the frosting, beat the cream cheese and butter together until light and fluffy, about 2-3 minutes. Add vanilla bean paste and beat until combined. Gradually add powdered sugar, one cup at a time, starting on low speed and increasing to high, beating well after each addition. Add the whole milk powder with the last cup of powdered sugar and beat until smooth and lump-free. Set aside.
- Step 6: Level the cakes with a serrated knife. On a cake stand or plate, spread a tablespoon of frosting to anchor the first layer. Place one cake layer on top, spread about ½ heaping cup frosting over it to the edges. Repeat for remaining layers. Optionally, apply a thin crumb coat around the cake and chill for 30 minutes before final frosting.
- Step 7: Finish frosting the cake and garnish with cake scraps if desired. Slice, serve, and enjoy!
Tips & Variations
- Use room temperature ingredients for smoother batter and frosting.
- For a deeper red color, add a bit more red food coloring, but avoid overmixing the batter.
- Crumb coating helps achieve a neater finish and seals in crumbs.
- Try substituting buttermilk with plain yogurt thinned with a little milk if needed.
Storage
Keep the cake covered at room temperature in a cake dome or container for up to 2 days. For longer storage, refrigerate covered to maintain freshness for 3-4 days. Bring to room temperature before serving for the best flavor and texture.
How to Serve
Serve this delicious recipe with your favorite sides.
FAQs
Can I make this cake ahead of time?
Yes, you can bake the layers a day ahead and store them wrapped tightly in plastic wrap in the fridge. Assemble and frost the cake the next day for best results.
What can I use instead of red food coloring?
You can try natural alternatives like beet juice or powder, but keep in mind that these may affect the flavor and color intensity of the cake.
PrintKnock Ya Socks Off Red Velvet Cake Recipe

A rich and moist Knock Ya Socks Off Red Velvet Cake featuring layers of tender red velvet sponge made with cocoa, buttermilk, and a hint of coffee, all enveloped in a smooth and creamy cream cheese frosting. This show-stopping cake is perfect for celebrations and sure to delight with its classic flavor and vibrant red hue.
- Prep Time: 25 minutes
- Cook Time: 35 minutes
- Total Time: 1 hour
- Yield: 12 servings 1x
- Category: Dessert
- Method: Baking
- Cuisine: American
Ingredients
Cake Ingredients
- 3 cups all-purpose flour
- ¼ cup whole milk powder
- 1 cup packed dark brown sugar
- 1 cup caster/superfine sugar (or granulated sugar)
- 2 tablespoons unsweetened cocoa powder
- 1 teaspoon baking powder
- 1 teaspoon baking soda
- 1 teaspoon kosher salt
- 3 large eggs
- 1 cup vegetable oil
- 1 cup buttermilk
- 1 tablespoon vanilla bean paste (or extract)
- 2 teaspoons distilled white vinegar
- 2 tablespoons red liquid food coloring (e.g. McCormick)
- 1 cup hot black coffee
Frosting Ingredients
- 16 ounces full-fat cream cheese bricks, room temperature
- 1 cup (2 sticks) salted butter, room temperature
- 1 tablespoon vanilla bean paste
- 5 cups powdered sugar
- ¼ cup whole milk powder
Instructions
- Prepare Pans and Oven: Position a rack in the center of the oven and preheat to 350°F. Spray the bottoms and sides of three 8-inch round cake pans with nonstick cooking spray. Line each pan with parchment paper rounds and spray the parchment as well. Set aside.
- Combine Dry Ingredients: In a large mixing bowl, whisk together the flour, whole milk powder, dark brown sugar, caster sugar, cocoa powder, baking powder, baking soda, and kosher salt until fully combined.
- Add Wet Ingredients: Into the same bowl, add eggs, vegetable oil, buttermilk, vanilla bean paste, distilled white vinegar, red food coloring, and hot black coffee. Whisk until the batter is smooth and runny. Divide evenly among the prepared pans and gently tap the pans on the counter to release air bubbles. Let batter rest while oven preheats.
- Bake the Cakes: Bake at 350°F for 30-35 minutes or until a toothpick inserted into the center comes out clean. Cool cakes in the pans for 15 minutes, then invert onto wire racks to cool completely before frosting.
- Make the Frosting: Using a stand mixer with paddle attachment or handheld mixer, beat softened cream cheese and butter together for 2-3 minutes until light and fluffy. Add vanilla bean paste and mix to combine. Gradually add powdered sugar one cup at a time, starting on low speed and increasing to high, beating well after each addition. Mix in whole milk powder with the last cup of powdered sugar. Continue beating until smooth and lump-free. Set aside.
- Assemble the Cake: Level cakes with a serrated knife, reserving scraps for decoration or snacks. Spread about a tablespoon of frosting on your cake stand to secure the cake. Place one cake layer atop and spread ½ heaping cup of frosting evenly to the edges. Repeat for remaining layers. Optionally, apply a thin crumb coat layer on the outside and chill the cake for 30 minutes to seal in crumbs.
- Final Frosting and Decoration: Finish frosting the cake evenly on the outside. Garnish with reserved red velvet cake scraps as desired. Slice and serve. Store covered at room temperature for up to 2 days or refrigerated for 3-4 days to maintain freshness.
Notes
- Using hot coffee in the batter enhances the chocolate flavor and moistness of the cake.
- Let the cakes cool completely before frosting to prevent melting and sliding.
- For best results, use room temperature cream cheese and butter in the frosting for smooth texture.
- Crumb coating helps achieve a clean finish and prevents crumbs in the final frosting layer.
- Store cake covered in a cake dome or airtight container to keep it moist.
Keywords: Red Velvet Cake, Cream Cheese Frosting, Layer Cake, Celebration Cake, Moist Cake, Classic Dessert