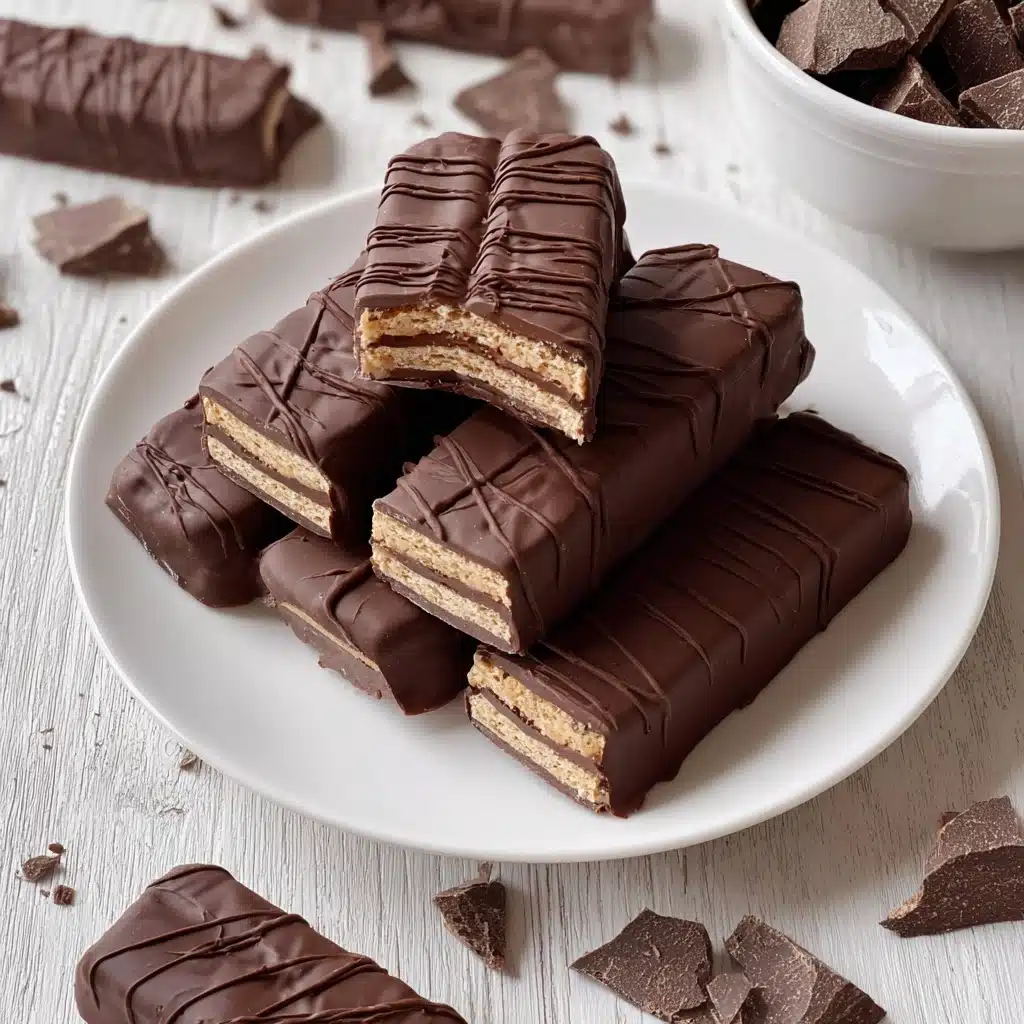
Healthy Kit Kat Recipe (Gluten Free, Vegan) Recipe
If you’ve been dreaming of a sweet treat that satisfies your chocolate cravings without compromising your dietary needs, you’re going to love this Healthy Kit Kat Recipe (Gluten Free, Vegan). It perfectly blends crunchy, rich, and creamy textures into one delightful snack, crafted entirely from wholesome ingredients. No gluten, no dairy, just pure indulgence that’s surprisingly good for you. Whether you’re vegan, gluten intolerant, or just in the mood for a healthier twist on a classic candy bar, this recipe is going to be your new favorite go-to.
Ingredients You’ll Need
This recipe keeps things simple but purposeful, highlighting ingredients that each bring something special to the table. From the nutty almond flour that creates a crunchy base to the velvety peanut butter adding smoothness in the fudge filling, every element plays a key role in achieving those iconic Kit Kat layers.
- 1 1/4 cup blanched almond flour (or tigernut flour) (115g): Provides a naturally gluten-free, nutty base essential for the cookie layers.
- 3 Tbsp coconut sugar: Adds gentle sweetness while keeping glycemic effects low.
- 1 Tbsp ground flax: Acts as a binder and egg substitute to maintain vegan status.
- 1/8 tsp salt: Enhances flavor and balances the sweetness.
- 3 Tbsp melted coconut oil: Brings moisture and richness without dairy.
- 1 Tbsp water: Helps bind the dough smoothly.
- 1 tsp vanilla extract: Adds warmth and depth to the cookie flavor.
- 2 Tbsp dark chocolate: Used in the fudge filling to bring a bittersweet contrast.
- 3 Tbsp peanut butter (or Sunbutter): Creates the creamy fudge texture and complements the chocolate perfectly.
- 1 cup dark chocolate (5oz): For the luscious chocolate coating.
- 1/2 Tbsp coconut oil: Ensures the chocolate coating melts smoothly and sets with a beautiful shine.
How to Make Healthy Kit Kat Recipe (Gluten Free, Vegan)
Step 1: Prepare the Cookie Base
First, preheat your oven to 350 degrees Fahrenheit to get it ready for baking these delicious cookie layers. Combine the almond flour, coconut sugar, ground flax, and salt in a bowl. These dry ingredients create the perfect sturdy foundation—nutty, slightly sweet, and textured just right. Next, stir in the melted coconut oil, water, and vanilla extract, beginning with a spatula and finishing by kneading the dough gently with your hands. This process helps bind everything together to form a pliable dough that rolls out easily.
Step 2: Shape and Bake the Cookie Layers
Roll the dough between two sheets of parchment paper until it’s about 1/8 inch thick, which is crucial for getting that satisfyingly crisp bite once baked. Use a knife or pizza cutter to slice the dough into rectangles roughly 3.5 inches by 0.75 inches—these will be the classic Kit Kat fingers you know and love. Place the cut dough on a baking sheet with the parchment paper underneath and bake for 8 to 10 minutes. Once baked, carefully separate the cookies on the sheet and let them cool before transferring to a wire rack. The thinness and crunchiness here form the iconic texture foundation.
Step 3: Make the Fudge Filling
While the cookies bake, melt the 2 tablespoons of dark chocolate gently, then stir in the peanut butter to create a luscious, thick fudge mixture. This step is the secret to mimicking that creamy, dreamy filling layer found in a traditional Kit Kat. Let the fudge cool for around 10 minutes so it thickens to a spreadable frosting-like consistency—this will help it hold nicely between the cookie layers without running.
Step 4: Assemble Your Kit Kats
Each little bar should have three cookie layers with two generous layers of the fudge filling sandwiched in between. Spread the cooled fudge evenly over one cookie, stack a second cookie on top, add another fudge layer, and finish with the third cookie. Place the assembled bars onto a lined baking sheet and pop them into the freezer for a bit to set and become firm, making the next step much easier.
Step 5: Coat in Chocolate
For the finishing touch, melt together the remaining dark chocolate and coconut oil in a small saucepan over low heat. Stir frequently to achieve a glossy, smooth coating. Remove the Kit Kat bars from the freezer and dip each bar one at a time into the melted chocolate, allowing them to be fully covered. Place them back onto the lined baking sheet and when all are dipped, drizzle any leftover chocolate on top for a pretty, professional finish. Allow the bars to set completely before serving.
How to Serve Healthy Kit Kat Recipe (Gluten Free, Vegan)

Garnishes
To elevate these delightful bars, you can sprinkle lightly crushed sea salt on top right after dipping them in chocolate—salty-sweet combinations always feel fancy. Another idea is to dust a tiny pinch of cocoa powder or finely chopped nuts like pistachios for extra crunch and color contrast.
Side Dishes
This Healthy Kit Kat Recipe (Gluten Free, Vegan) makes a wonderful treat on its own, but you can serve it alongside fresh berries, a cup of almond milk, or a scoop of vegan vanilla ice cream to round out a dessert experience that feels both indulgent and balanced.
Creative Ways to Present
Arrange these homemade Kit Kat bars in a decorative box or gift wrap them individually to share your creation with friends. For parties, stacking them upright in a clear jar adds a fun visual pop, or slice them into bite-sized pieces for a charming party platter.
Make Ahead and Storage
Storing Leftovers
Keep your Healthy Kit Kat bars fresh by storing them in an airtight container in the refrigerator. This helps maintain their crisp texture and keeps the chocolate coating firm while preserving the fudge filling’s creamy softness.
Freezing
These bars freeze beautifully, making them perfect for preparing in advance. Wrap them individually or place them in a sealed container with parchment paper between layers to prevent sticking. When you want a quick treat, just thaw in the refrigerator or at room temperature.
Reheating
If you prefer a slightly melty version, warm the bars gently for a few seconds in the microwave or let them sit at room temperature. Be cautious not to overheat, especially the chocolate coating, as it can become too soft and lose the signature snap.
FAQs
Can I use other nut flours for this recipe?
Yes! While blanched almond flour is recommended for its texture and flavor, tigernut flour is a great gluten-free alternative. Other nut flours like hazelnut or cashew might affect the texture but can be experimented with if you’re feeling adventurous.
Is this Healthy Kit Kat Recipe (Gluten Free, Vegan) safe for people with nut allergies?
This recipe uses almond or tigernut flour and peanut or sunflower seed butter, so it is not safe for those with nut allergies. However, you can substitute with seed-based flours and butters for a nut-free version, but expect some variation in taste and texture.
Can I skip the coconut sugar and use another sweetener?
You can, but it may change the flavor profile slightly. Options like maple syrup or agave nectar could work, though you would need to adjust the liquid content accordingly. Coconut sugar is great here because it offers caramel notes and keeps the cookie crisp.
How long do these bars last once made?
Stored properly in the fridge, they last about 5 to 7 days. Because there are no preservatives, it’s best to enjoy them within a week for maximum freshness and taste.
Can I make these without peanut butter?
Absolutely! Sunbutter or any other nut or seed butter can be swapped in place of peanut butter to suit your taste or dietary preferences. Just make sure it’s creamy so it blends smoothly into the fudge layer.
Final Thoughts
This Healthy Kit Kat Recipe (Gluten Free, Vegan) is a total game-changer for anyone craving chocolate and crunch without the guilt. It’s fun to make, so satisfying to bake, and utterly delightful to eat—plus, it fits beautifully into a health-conscious lifestyle. Grab your ingredients and get ready to impress yourself and everyone around with this amazing homemade treat!
PrintHealthy Kit Kat Recipe (Gluten Free, Vegan) Recipe

This Healthy Kit Kat recipe is a delicious, gluten-free, and vegan alternative to the classic treat. Made with almond flour, coconut sugar, and rich dark chocolate, these homemade Kit Kats offer a satisfying crunch layered with a creamy fudge filling, all coated in smooth dark chocolate. Perfect for those seeking a healthier indulgence without compromising on taste.
- Prep Time: 20 minutes
- Cook Time: 10 minutes
- Total Time: 50 minutes
- Yield: Approximately 6 Kit Kat bars (each bar consists of 3 cookies layered with fudge) 1x
- Category: Snack, Dessert
- Method: Baking and dipping
- Cuisine: American
- Diet: Gluten Free
Ingredients
Cookie Dough
- 1 1/4 cup blanched almond flour (or tigernut flour) (115g)
- 3 Tbsp coconut sugar
- 1 Tbsp ground flaxseed
- 1/8 tsp salt
- 3 Tbsp melted coconut oil
- 1 Tbsp water
- 1 tsp vanilla extract
Fudge Filling
- 2 Tbsp dark chocolate
- 3 Tbsp peanut butter (or Sunbutter)
Chocolate Coating
- 1 cup dark chocolate (5 oz)
- 1/2 Tbsp coconut oil
Instructions
- Preheat the Oven: Set your oven to 350°F (175°C) to prepare for baking the cookies.
- Mix Dry Ingredients: In a medium-sized mixing bowl, combine the almond flour, coconut sugar, ground flaxseed, and salt thoroughly.
- Add Wet Ingredients: Stir in melted coconut oil, water, and vanilla extract. Initially use a spatula to combine, then knead the dough gently by hand until cohesive.
- Roll the Dough: Place dough between two sheets of parchment paper and roll out with a rolling pin to about 1/8 inch thickness.
- Cut Cookie Rectangles: Using a knife or pizza cutter, slice the dough into rectangles approximately 3.5 inches by 0.75 inches. Remove excess dough for re-rolling.
- Bake the Cookies: Transfer the parchment with cut dough onto a baking sheet, bake for 8-10 minutes at 350°F until set.
- Cool Cookies: Remove from oven, carefully separate cookies if stuck, and allow to cool on the baking sheet for 5-10 minutes before moving to a wire rack.
- Prepare Fudge Filling: Melt the 2 tablespoons of dark chocolate and mix in the peanut butter until smooth and well combined.
- Cool Fudge: Let the fudge mixture cool for about 10 minutes until thick enough to spread like frosting.
- Assemble Kit Kats: Spread fudge on three cookies to make two layers, stacking them to create one Kit Kat bar. Place assembled bars on a lined baking sheet and freeze until firm.
- Melt Coating Chocolate: In a small saucepan over low heat, melt 1 cup dark chocolate with 1/2 tablespoon coconut oil, stirring frequently until smooth.
- Coat the Bars: Remove Kit Kats from freezer and dip each bar into the melted chocolate, coating thoroughly.
- Set Coating: Place coated Kit Kats on a lined baking sheet to set the chocolate coating.
- Finish Decoration: Drizzle any remaining melted chocolate over the coated bars for a decorative finish. Allow chocolate to fully harden before serving.
Notes
- Almond flour can be substituted with tigernut flour for a nut-free option.
- Ground flaxseed acts as a binder, but can be replaced with chia seed if preferred.
- Use high-quality dark chocolate (70% cocoa or higher) for best flavor and health benefits.
- Peanut butter can be swapped with Sunbutter (sunflower seed butter) for a nut-free alternative.
- Store assembled Kit Kats in the freezer to maintain firmness and freshness.
- Be careful not to overbake cookies; they should be slightly soft when removed from the oven.
Nutrition
- Serving Size: 1 Kit Kat bar (3 cookies with fudge and chocolate coating)
- Calories: 220
- Sugar: 8g
- Sodium: 60mg
- Fat: 16g
- Saturated Fat: 7g
- Unsaturated Fat: 7g
- Trans Fat: 0g
- Carbohydrates: 15g
- Fiber: 3g
- Protein: 5g
- Cholesterol: 0mg
Keywords: Healthy Kit Kat, Gluten Free Kit Kat, Vegan Kit Kat, Almond Flour Cookies, Homemade Kit Kat, Dark Chocolate Treats, Peanut Butter Fudge, Low Sugar Dessert