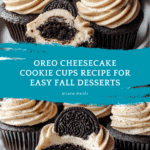
Delicious Oreo Cheesecake Cookie Cups for Sweet Cravings Recipe
If you have a sweet tooth and love the irresistible combination of rich cheesecake and classic Oreos, you are going to fall head over heels for these Delicious Oreo Cheesecake Cookie Cups for Sweet Cravings. Imagine creamy, dreamy cheesecake swirled with the crunch of Oreo cookie crust, all perfectly portioned into adorable cups that make indulging effortless and fun. These little delights balance textures and flavors beautifully, making them a favorite to share with friends or savor all by yourself. Let’s dive into what makes these cookie cups so special and how simple it is to whip them up.

Ingredients You’ll Need
The beauty of these Delicious Oreo Cheesecake Cookie Cups for Sweet Cravings lies not just in their taste but in their simplicity. Each ingredient plays a crucial role, from the crumbly Oreo crust to the luxuriously creamy filling and the light whipped topping. Here’s what you’ll need to create this crowd-pleaser:
- 20 Oreo Cookies (crumbled): The foundation for that iconic chocolatey crunch that makes these cups unforgettable.
- 5 tablespoons Butter (melted unsalted): Helps bind the Oreo crumbs into a sturdy, buttery crust.
- 16 ounces Cream Cheese (softened): Provides the rich and creamy cheesecake texture that’s the star of the show.
- 1/2 cup Sugar: Sweetens the filling just right without overpowering the Oreo flavor.
- 1/2 cup Sour Cream (or Greek yogurt): Adds a subtle tang and smoothness to the cheesecake mixture.
- 1/2 cup Mini Chocolate Chips (optional): Sprinkle in these for extra bursts of chocolatey goodness throughout.
- 1 cup Whipped Cream (lightly sweetened): The perfect airy topping that finishes off each cookie cup beautifully.
How to Make Delicious Oreo Cheesecake Cookie Cups for Sweet Cravings
Step 1: Preheat and Prepare
Start by preheating your oven to 350°F (175°C). This ensures your cookie cups bake evenly and get that perfect texture. Next, get your muffin tin ready by lining it with cupcake liners, so your cookie cups lift out effortlessly once baked.
Step 2: Create the Oreo Crust
Crush all 20 Oreo cookies into fine crumbs—using a food processor or by hand with a rolling pin wrapped in a plastic bag works great. Mix those crumbs with the melted unsalted butter until everything is well combined and looks like wet sand.
Step 3: Form the Cookie Cups
Take about one tablespoon of the Oreo crumb mixture and firmly press it into the bottom and up the sides of each cupcake liner. This forms your delicious crust that will hold the cheesecake filling perfectly without falling apart.
Step 4: Whip Up the Cheesecake Filling
In a mixing bowl, beat the softened cream cheese together with sugar until fluffy and smooth. Then gently blend in the sour cream for that creamy tang. If you want to amp up the chocolate flavor, fold in mini chocolate chips now for little bursts of chocolate fun throughout each bite.
Step 5: Assemble and Bake
Spoon the luscious cheesecake filling evenly over each Oreo crust in the cupcake liners. Bake your cookie cups in the preheated oven for 15 to 18 minutes. You’ll know they’re done when the centers are slightly jiggly but set at the edges.
Step 6: Cool and Chill
Let the cookie cups cool completely at room temperature before refrigerating them for at least one hour. This chilling step is key to getting that signature cheesecake firmness and flavor development.
Step 7: Add the Final Touch
Just before serving, pipe or spoon a generous dollop of lightly sweetened whipped cream on top of each cookie cup. This adds a cloud-like softness that perfectly balances the rich cheesecake and crunchy Oreo crust.
How to Serve Delicious Oreo Cheesecake Cookie Cups for Sweet Cravings

Garnishes
Adding a little garnish can elevate these cookie cups from delightful to extraordinary. Consider sprinkling a few crushed Oreo crumbs or mini chocolate chips on the whipped cream topping. Fresh berries or a drizzle of chocolate or caramel sauce also add a beautiful pop of color and flavor contrast.
Side Dishes
While these cookie cups shine on their own as a dessert, they also pair wonderfully with a scoop of vanilla ice cream or a fresh fruit salad. The creamy cold ice cream creates an exciting temperature contrast that’s a thrill for your sweet cravings. A hot cup of coffee or tea complements their richness perfectly, making a cozy treat for any occasion.
Creative Ways to Present
For a festive touch, serve these Oreo Cheesecake Cookie Cups in mini cupcake liners with colorful patterns. Place them on a pretty dessert tray or tiered stand for gatherings to wow your guests. You can even sprinkle edible glitter or add tiny edible flowers on top for a fancy dessert table statement that impresses visually as much as it tastes amazing.
Make Ahead and Storage
Storing Leftovers
If you have any leftovers (and we hope you do!), store them in an airtight container in the refrigerator. They will stay fresh for up to 3 days, allowing you to enjoy the perfect bite of these Delicious Oreo Cheesecake Cookie Cups for Sweet Cravings whenever the mood strikes.
Freezing
You can absolutely freeze these cookie cups for longer storage. Arrange them in a freezer-safe container with parchment paper layers to prevent sticking. When wrapped well, they keep up to one month, maintaining their creamy texture and delightful Oreo crunch.
Reheating
When ready to enjoy frozen cookie cups, simply thaw them in the refrigerator overnight. Since they are best served chilled, reheating is not necessary. Just add fresh whipped cream on top and dig in to those tasty moments once again.
FAQs
Can I use regular yogurt instead of sour cream?
Yes! Plain Greek yogurt is a great substitute for sour cream as it provides similar tartness and creaminess without altering the overall texture of your cheesecake cookie cups.
Are mini chocolate chips necessary?
Not at all. Mini chocolate chips are optional and add a lovely extra chocolate flavor, but the cookie cups are delicious even without them. You can also substitute with crushed nuts or skip them for a classic Oreo cheesecake taste.
How long do these cookie cups keep in the fridge?
Stored properly in an airtight container, these cookie cups last up to 3 days in the refrigerator, making them a perfect make-ahead treat for parties or busy days.
Can I make these gluten-free?
Absolutely! Just swap the Oreo cookies for a gluten-free chocolate sandwich cookie of your choice, and the rest of the recipe remains the same for a safe and tasty option.
What’s the best way to crush Oreos?
Use a food processor for quick and uniform crumbs. If you don’t have one, place the cookies in a sealed plastic bag and crush them with a rolling pin or heavy pan until they reach a fine crumb consistency.
Final Thoughts
If you want to treat yourself or impress friends with a dessert that hits every sweet craving just right, these Delicious Oreo Cheesecake Cookie Cups for Sweet Cravings are the way to go. They combine simplicity, flavor, and charm all in one perfect bite. Trust me, once you try making and eating these, they’ll become your new favorite go-to dessert. So preheat that oven, gather your ingredients, and get ready to fall in love with every delightful layer of these cookie cups!
PrintDelicious Oreo Cheesecake Cookie Cups for Sweet Cravings Recipe
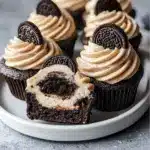
These Oreo Cheesecake Cookie Cups combine the crunchy, chocolatey goodness of Oreo cookies with a creamy, tangy cheesecake filling. Perfect for sweet cravings, these individual cups are easy to make and can be enjoyed as a delightful dessert or snack. Lightly sweetened whipped cream tops off each cup, adding a fluffy finish to every bite.
- Prep Time: 20 minutes
- Cook Time: 18 minutes
- Total Time: 1 hour 38 minutes
- Yield: 12 cookie cups 1x
- Category: Dessert
- Method: Baking
- Cuisine: American
- Diet: Vegetarian
Ingredients
Crust
- 20 Oreo Cookies (crumbled)
- 5 tablespoons unsalted Butter (melted)
Filling
- 16 ounces Cream Cheese (softened)
- 1/2 cup Sugar
- 1/2 cup Sour Cream (or Greek yogurt)
- 1/2 cup Mini Chocolate Chips (optional)
Topping
- 1 cup Whipped Cream (lightly sweetened)
Instructions
- Preheat the Oven: Preheat your oven to 350°F (175°C) to prepare for baking the cheesecake cups.
- Prepare the Crust: Crush the Oreo cookies into fine crumbs using a food processor or by placing them in a sealed bag and crushing with a rolling pin. Mix the crumbs thoroughly with melted unsalted butter until well combined.
- Form the Crust Cups: Line a muffin tin with cupcake liners. Spoon about one tablespoon of the Oreo butter mixture into each liner and press down firmly to create an even crust base for each cup.
- Make the Filling: In a mixing bowl, beat the softened cream cheese with sugar until light and fluffy. Gradually blend in the sour cream, mixing until smooth and creamy.
- Add Chocolate Chips: Fold mini chocolate chips into the cheesecake filling if you desire a bit of extra chocolate texture.
- Fill the Cups: Spoon the cheesecake filling evenly over the prepared Oreo crusts in the muffin liners.
- Bake: Bake the filled muffin tin in the preheated oven for 15 to 18 minutes, or until the centers of the cheesecake cups are just slightly jiggly.
- Cool and Chill: Remove from the oven and allow to cool completely at room temperature. Then refrigerate the cheesecake cups for at least one hour to set fully.
- Add Topping: Before serving, pipe or dollop the lightly sweetened whipped cream on top of each cheesecake cup for a fluffy finishing touch.
Notes
- Using sour cream adds a slight tang and creaminess, but Greek yogurt can be substituted for a healthier option.
- Be sure to fully chill the cheesecake cups to allow them to set firmly.
- Mini chocolate chips are optional but add delightful texture and chocolate bursts.
- For best results, use unsalted butter to balance the sweetness.
- Ensure cream cheese is softened to avoid lumps in the filling.
Nutrition
- Serving Size: 1 cookie cup
- Calories: 280
- Sugar: 18g
- Sodium: 140mg
- Fat: 18g
- Saturated Fat: 10g
- Unsaturated Fat: 6g
- Trans Fat: 0g
- Carbohydrates: 26g
- Fiber: 1g
- Protein: 4g
- Cholesterol: 55mg
Keywords: Oreo cheesecake, cookie cups, no-bake crust, mini cheesecakes, easy dessert, party treats, individual desserts