20 Minute Mango Sticky Rice Recipe
If you have a craving for a sweet, creamy, and utterly satisfying dessert that comes together faster than you might expect, this 20 Minute Mango Sticky Rice recipe is here to delight your taste buds. Combining perfectly tender sticky rice soaked in rich coconut milk with the juicy, fragrant sweetness of ripe mango, this dish is a tropical sensation captured in minutes. It’s simple, fresh, and indulgently comforting all at once—an absolute must-try whether you’re a longtime fan of Thai desserts or discovering mango sticky rice for the first time.
Ingredients You’ll Need
One of the joys of this recipe is how straightforward the ingredient list is. Each item plays a crucial role: from the sticky rice providing that signature chewy texture, to the coconut milk adding luscious creaminess, and of course, the mango bringing a burst of tropical flavor and vivid color.
- Sticky rice (1½ cups): Also known as glutinous or sweet rice, this rice type gives the dish its chewy, satisfying bite.
- Boiling water (1¾ cups): Essential for soaking the rice just right to create the perfect texture.
- Coconut milk (1¾ cups, divided): The star ingredient that infuses the rice with its signature creamy sweetness.
- Sugar (¼ cup plus 3 tablespoons): Sweetens both the rice and the coconut sauce to balance flavors beautifully.
- Salt (½ teaspoon): A small pinch to amplify the sweetness and round out the flavors.
- Corn starch (1 teaspoon): Helps thicken the coconut sauce for that luxurious finish.
- Ripe honey mangos (1-2): Peeled and sliced thin, these create a refreshing and juicy contrast to the creamy rice.
- Sesame seeds (1½ teaspoons, optional): Adds a subtle nutty crunch and a pretty garnish.
How to Make 20 Minute Mango Sticky Rice
Step 1: Preparing the Sticky Rice
Start by thoroughly washing the sticky rice to remove excess starch, rinsing with water until it runs clear. This step ensures your rice stays perfectly sticky but not mushy. Drain well, then pour boiling water over the rice and let it soak uncovered for 10 minutes. This quick soak helps soften the grains evenly before cooking.
Step 2: Cooking the Rice
After soaking, stir the rice and cover it loosely, then microwave on high for 3 minutes. Carefully remove, stir gently to fluff, cover again, and microwave for an additional 3 minutes. Most liquid should absorb by now—if not, give it one more 3-minute boost. The result is delightfully tender rice ready to soak up the coconut milk.
Step 3: Preparing the Coconut Milk Soak
While the rice cooks, heat 1¼ cups of coconut milk with ¼ cup sugar in a saucepan over medium heat, stirring until the sugar dissolves. Set this fragrant mixture aside to cool slightly. Once the rice is cooked, stir the coconut milk soak into the rice and let it absorb all those luscious flavors.
Step 4: Making the Coconut Sauce
Using the same saucepan, combine the remaining ½ cup coconut milk with 3 tablespoons sugar, ½ teaspoon salt, and 1 teaspoon corn starch. Whisk it together and bring to a boil over medium heat until it thickens into a silky sauce—this will be the perfect drizzle that takes your mango sticky rice to the next level.
Step 5: Assembling the Dish
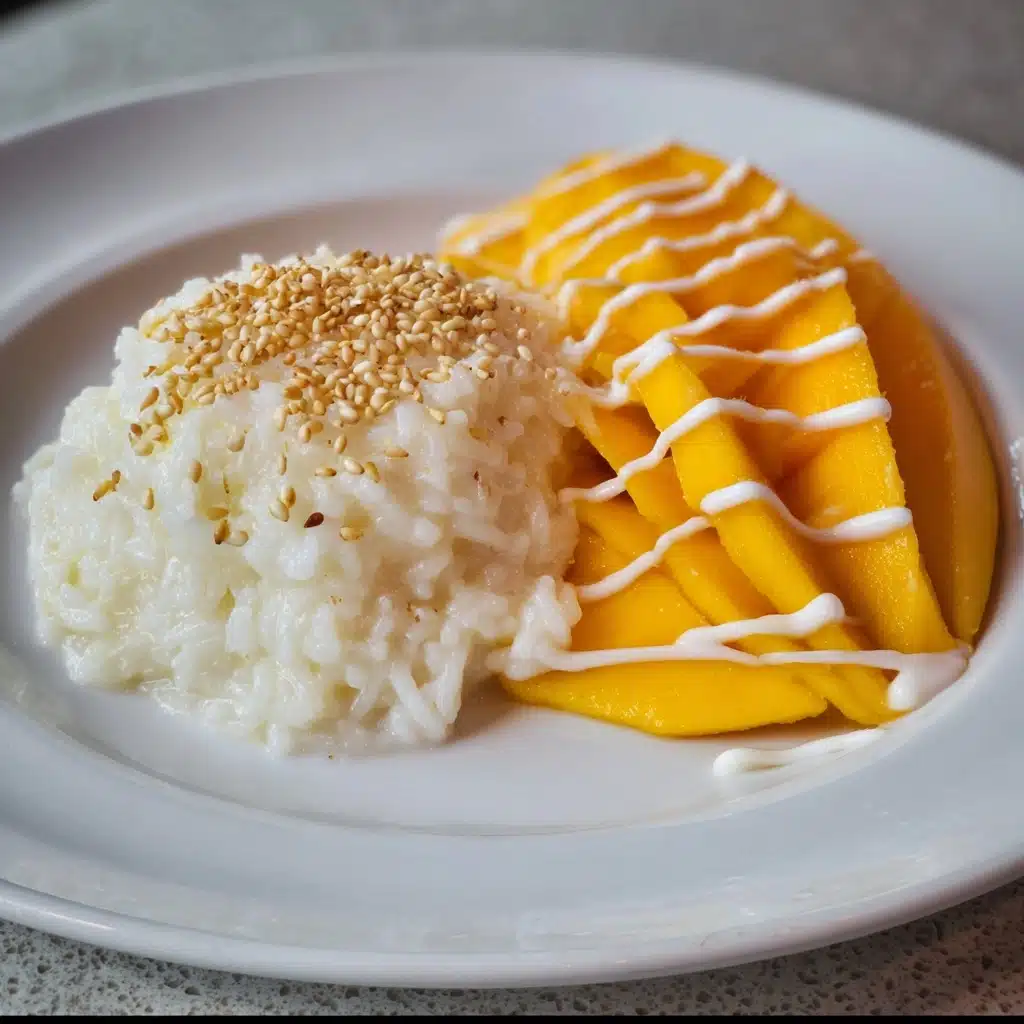
Place the creamy coconut-infused sticky rice on your serving plates and arrange the thin mango slices alongside. For an extra touch, sprinkle the optional toasted sesame seeds on top for a hint of crunch and visual appeal. Finally, spoon that rich coconut sauce over everything and enjoy immediately!
How to Serve 20 Minute Mango Sticky Rice

Garnishes
A sprinkle of toasted sesame seeds adds a lovely nutty crunch that beautifully complements the softness of both the rice and mango. You can also try chopped toasted peanuts or a few fresh mint leaves for a refreshing twist.
Side Dishes
Though mango sticky rice shines as a dessert on its own, it pairs wonderfully with light Asian-inspired meals such as grilled lemongrass chicken or fresh spring rolls. The sweetness from the dessert offers a perfect counterpoint to savory dishes.
Creative Ways to Present
For an eye-catching presentation, try molding the sticky rice into neat shapes using small bowls or dessert molds, then arrange the mango slices artfully alongside. Serving in individual glass jars or cups also makes for a charming, portable treat for parties or gatherings.
Make Ahead and Storage
Storing Leftovers
Leftover mango sticky rice keeps best when stored in an airtight container in the refrigerator for up to 2 days. Keep the mango separate to maintain its freshness and texture, adding it fresh when serving.
Freezing
Freezing is not recommended for this dish as the texture of sticky rice and mango can be compromised once thawed. It’s best enjoyed fresh within a couple of days.
Reheating
To reheat the sticky rice, cover it with a damp paper towel and microwave on medium heat in short bursts until warm and soft. Avoid overheating, which can dry out the rice. Then add fresh mango slices right before serving.
FAQs
Can I use regular rice instead of sticky rice?
Sticky rice has a unique texture essential to authentic mango sticky rice. Regular rice won’t yield the same chewy, gluey consistency, so it’s best to stick with glutinous rice for this recipe.
What type of mango works best?
Ripe honey mangoes are ideal due to their sweetness and smooth texture. However, other ripe varieties like Ataulfo or Keitt work well as long as they’re fragrant, juicy, and slightly soft to the touch.
Is it possible to make this recipe dairy-free?
Absolutely! This recipe is naturally dairy-free since it uses coconut milk, making it perfect for those avoiding dairy or following a plant-based diet.
Can I prepare the sticky rice without a microwave?
Yes! You can steam the soaked sticky rice in a bamboo steamer or over a pot of boiling water for about 15-20 minutes until tender. Just make sure to keep it covered with a cloth to trap steam properly.
How sweet should the dish be?
The sugar amounts in this recipe create a pleasantly sweet balance that complements the mango’s natural sweetness without overpowering it. You can always adjust to taste by adding a bit more or less sugar during preparation.
Final Thoughts
There’s something truly magical about how quickly and easily you can whip up this 20 Minute Mango Sticky Rice to bring a taste of tropical paradise right to your table. Whether you’re treating yourself after a long day or sharing with friends, it’s a dessert that always feels like a special occasion. Give it a try—you might find it becoming your go-to sweet treat from now on!
Print20 Minute Mango Sticky Rice Recipe

A quick and delicious Thai-inspired dessert featuring creamy coconut-infused sticky rice served with sweet ripe mango slices and a luscious coconut sauce, ready in just 20 minutes.
- Prep Time: 5 minutes
- Cook Time: 15 minutes
- Total Time: 20 minutes
- Yield: 4 servings 1x
- Category: Dessert
- Method: Microwaving, soaking, stovetop simmering
- Cuisine: Thai
- Diet: Vegetarian
Ingredients
Sticky Rice
- 1½ cups sticky rice (also called glutinous or sweet rice)
- 1¾ cups boiling water
Coconut Mixture
- 1¾ cups coconut milk, divided (equivalent to a 13.5 ounce can)
- ¼ cup sugar
- 3 tablespoons sugar
- ½ teaspoon salt
- 1 teaspoon corn starch
Other
- 1–2 ripe honey mangos, peeled and cut into thin slices
- 1½ teaspoons sesame seeds (optional)
Instructions
- Gather Ingredients: Collect all required ingredients including sticky rice, coconut milk, sugar, salt, corn starch, mangoes, and sesame seeds.
- Wash the Rice: Place sticky rice in a microwave-safe bowl, fill with water, and stir with your hand to wash. Pour out the water and repeat two more times until the water runs clear.
- Drain and Soak Rice: Drain the rice thoroughly using a colander. Pour boiling water over the rice and let it soak uncovered for 10 minutes.
- Prepare Coconut Mixture: In a saucepan, combine 1¼ cups coconut milk with ¼ cup sugar. Heat over medium heat until sugar dissolves, then turn off the heat and set aside.
- Microwave Rice (First Session): After soaking, stir the rice. Cover with a microwave-safe plate or loosely with plastic wrap and microwave on high for 3 minutes.
- Microwave Rice (Second Session): Carefully remove the rice, uncover to avoid steam burns, stir from bottom up, cover again, and microwave for another 3 minutes.
- Check and Finish Cooking Rice: Remove the bowl, uncover, and stir. If water remains, microwave for an additional 3 minutes until water is absorbed.
- Mix Coconut Milk with Rice: Pour the reserved coconut mixture (from step 4) over the hot rice, stir, and let it absorb.
- Prepare Coconut Sauce: In the same saucepan, add the remaining ½ cup coconut milk, 3 tablespoons sugar, ½ teaspoon salt, and 1 teaspoon corn starch. Whisk and heat over medium until the sauce boils and thickens.
- Serve: Plate the sticky rice and arrange mango slices alongside. Optionally sprinkle sesame seeds on top and drizzle with the thickened coconut sauce. Enjoy!
Notes
- Use ripe, sweet mangoes for the best flavor contrast with the sticky rice.
- Microwave times may vary slightly depending on your appliance; adjust as needed to ensure rice is fully cooked.
- Sesame seeds add a nice crunch and subtle nuttiness but are optional.
- You can substitute the honey mango with Ataulfo or other sweet mango varieties.
- For a vegan version, ensure the coconut milk is pure and doesn’t contain additives.
Nutrition
- Serving Size: 1 serving (approx. 1 cup rice with mango and sauce)
- Calories: 350 kcal
- Sugar: 25 g
- Sodium: 150 mg
- Fat: 12 g
- Saturated Fat: 10 g
- Unsaturated Fat: 2 g
- Trans Fat: 0 g
- Carbohydrates: 55 g
- Fiber: 2 g
- Protein: 3 g
- Cholesterol: 0 mg
Keywords: Mango sticky rice, Thai dessert, coconut sticky rice, quick mango dessert, sticky rice recipe